
Road Markings and White Lines: A Guide for Learner Drivers
When you first begin learning to drive, it is easy to focus only on the car — steering, clutch control, mirrors, signalling and building confidence behind the wheel. But another essential area that learner drivers must master early on is understanding road markings and white lines. These markings guide traffic, control flow, improve safety and help you understand what you must do in different situations. They tell you where to position your vehicle, when you can overtake, when to stop, where to turn and how to stay within your lane. In many ways, they are the silent instructors of the road.
For new drivers, road markings and white lines can look confusing at first, especially on busy roads or complicated junctions. You may see solid lines, dashed lines, zig-zag markings, coloured lanes, box junctions and a range of symbols painted on the surface. Each of these has a meaning. Understanding them is not only essential for your theory test and practical driving test but also for your everyday safety once you pass. This guide breaks down road markings and white lines in a clear and simple way so you can recognise what they mean, respond correctly and drive with confidence.
Why Road Markings Matter for Learner Drivers
Every day on the road, you make decisions based on what you see. Road markings help you make those decisions safely and consistently. They reduce confusion, guide drivers in unfamiliar areas and provide instructions even when signs are not visible. In poor weather, at night or during heavy traffic, road markings become even more important because they help you position your vehicle correctly.
Understanding road markings and white lines helps you avoid mistakes such as drifting into the wrong lane, stopping in restricted areas, blocking junctions or overtaking where it is dangerous. These mistakes can lead to penalties, failed tests or accidents. When you fully understand markings, driving becomes more predictable, calm and controlled.
Road Markings and White Lines: The Basics You Must Know
The first thing learner drivers need to understand is the difference between solid and broken white lines. Broken white lines separate lanes going in the same direction and indicate where it is safe to change lanes. Solid white lines often indicate restrictions, such as no overtaking or areas where lane changes are unsafe. When you understand this basic principle, interpreting other markings becomes easier.
White lines help show boundaries, guide positioning and manage traffic flow. Yellow lines, meanwhile, control waiting, loading and parking. Red lines are used in red routes to restrict stopping entirely. But it is mainly road markings and white lines that you will interact with during lessons and tests.
Understanding Broken White Lines
Broken white lines are the most common markings you will see on UK roads. They separate lanes, show the centre of the road and guide traffic. These lines tell you that you may cross them if it is safe, for example when overtaking, turning or changing lanes.
On wider roads, broken white lines help you maintain good lane discipline. During your practical test, the examiner will expect you to stay centred within your lane and avoid drifting. Broken lines also appear before hazards such as bends or roundabouts, helping you see lane structure clearly.
Road Markings and White Lines: When Solid White Lines Matter
Solid white lines carry strict rules. A single solid white line in the centre of the road means you must not cross or straddle it except in limited situations. These include passing a stationary vehicle, avoiding a hazard or entering a property on the other side. A double solid white line on your side means overtaking is prohibited except in specific situations such as overtaking a bicycle or horse travelling below 10mph.
If the solid line is on the opposite side of the centre, the restriction applies to oncoming traffic, not you. Solid white lines also appear at the edges of certain roads to mark boundaries or cycle lanes. For learners, recognising solid lines is crucial because ignoring them can lead to serious mistakes.
Lane Guidance and Arrow Markings
Arrow markings on the road indicate where each lane leads. You might see straight arrows, left-turn arrows, right-turn arrows or combinations on dual lanes. These markings help avoid last-minute lane changes, especially at roundabouts and large junctions.
During your test, the examiner will expect you to follow arrow markings without hesitation. This means checking mirrors early, signalling when appropriate and positioning yourself smoothly. If you enter the wrong lane by mistake, stay calm; the safest approach is often to follow the lane rather than force a change.
Road Markings and White Lines: Understanding Centre Lines and Hazard Warning Lines
Centre lines separate opposing traffic. If they appear as short dashed lines, overtaking is usually permitted. When the dashed lines become longer and closer together, this indicates a hazard. It warns you that overtaking is dangerous and should be avoided.
Learners often miss the difference between standard dashed lines and hazard warning lines. Recognising this subtle shift helps you anticipate bends, dips or narrow sections early. Examiners look for early anticipation and smooth speed adjustments in these areas.
Zig-Zag Lines at Pedestrian Crossings
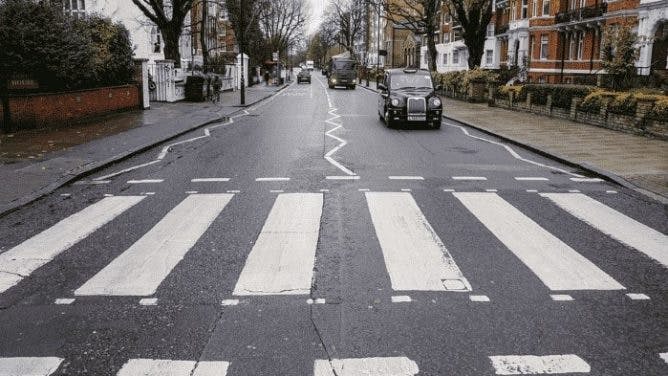
Zig-zag markings appear before and after pedestrian crossings. These are high-importance markings indicating that stopping or parking is strictly prohibited. The purpose is to keep visibility clear so pedestrians and drivers can see each other.
Learner drivers must never stop, wait or park on zig-zags. Even slowing down unnecessarily can confuse pedestrians and other drivers. Zig-zags also appear around school entrances, and the same rules apply. Understanding these markings is essential for safe and legal driving.
Road Markings and White Lines: Box Junctions
Box junctions are marked by yellow criss-cross lines. These appear at busy crossroads to prevent traffic from blocking the junction. You must not enter a box junction unless your exit is clear. The only exception is when turning right and waiting for oncoming traffic.
Learners often find box junctions stressful, especially during heavy traffic. The key is to stay patient, move only when you have space to exit and avoid stopping inside the box. During your test, hesitation is better than blocking a junction.
Bus Lanes and Cycle Lanes
Bus lanes are marked with solid or dashed white lines, coloured surfacing and clear text. The rules depend on the time plates displayed next to the lane. Some operate 24/7, while others are active only during certain hours. Learners must check signs and markings carefully because using a bus lane at the wrong time could lead to penalties.
Cycle lanes can be mandatory or advisory. Mandatory cycle lanes have a solid white line and must not be entered during operational hours. Advisory cycle lanes have a broken white line, meaning you may enter only if necessary and safe. Understanding these markings protects cyclists and helps you demonstrate good awareness.
Road Markings and White Lines: Stop Lines and Give-Way Lines
Stop lines appear at traffic lights and junctions. A solid stop line requires you to stop completely when the light is red. If you cross the line, even slightly, it is considered running the signal.
Give-way lines, on the other hand, are broken. At a give-way junction, you must slow down, assess the road and proceed only when it is safe. Learners are expected to judge gaps confidently, avoid unnecessary stops and maintain control. Clear understanding of stop and give-way markings improves your junction skills significantly.
Coloured Road Surfaces and High-Friction Areas
Some roads use coloured surfacing to highlight danger zones, cycle lanes or bus lanes. Red surfacing often indicates areas where lane discipline is crucial or where traffic merges. Green or blue surfaces usually identify cycle lanes or shared spaces.
High-friction surfaces, often in darker shades, appear near pedestrian crossings or sharp bends. These help tyres grip the road better in dangerous areas. Learners should use these visual cues to prepare for changes in speed or hazards.
Road Markings and White Lines: Mini Roundabout Markings
Mini roundabouts use white circle markings to guide drivers. These are small painted circles rather than raised structures. The rule is simple: you must drive around the circle, not over it, unless it is unsafe or impossible due to road layout.
Examiners look closely at your approach, your lane positioning and your ability to judge priority. Understanding the markings helps you navigate mini roundabouts without confusion.
Parking Bays and Loading Restrictions
Parking bays are marked with white lines and may include additional wording like “Permit Holders Only”, “Disabled”, or “Pay and Display”. Yellow markings next to kerbs indicate loading restrictions.
Learners should practise reading these markings quickly and calmly. Even if you are not parking during your test, understanding the markings improves your road awareness and ensures you do not stop in restricted zones.
Road Markings and White Lines: Shared Spaces and Quiet Streets
Some modern roads use fewer markings to encourage slower, more cautious driving. These shared-space areas rely on driver judgement rather than strict painted lines. Learners must show increased awareness, maintain low speed and anticipate movements from pedestrians and cyclists.
Understanding how marking-free zones work prepares you for real-world driving beyond test routes.
Using Road Markings to Improve Your Lane Positioning
One of the biggest challenges for new drivers is maintaining a steady, centred lane position. Road markings provide clear guidance. Following the centre line and kerb line helps you stay stable, avoid drifting and prepare for upcoming turns.
Good lane positioning is essential for passing your test. The examiner will watch how you respond to lane markings in different environments, including dual carriageways, town centres, roundabouts and rural roads.
Final Thoughts
Understanding road markings and white lines is one of the most important skills you will develop as a learner driver. These markings guide your decisions, keep you safe and help you communicate clearly with other road users. When you know how to read the road surface confidently, everything else becomes easier — from lane discipline to overtaking to recognising hazards early.
The more familiar you become with road markings and white lines, the safer, calmer and more prepared you will feel during lessons and on your driving test. By practising consistently and paying attention to the markings around you, you will build strong habits that stay with you long after you pass.


